Difference between revisions of "quick Start Guide"
m (Added some horizontal dividing lines) |
Technology (talk | contribs) m (→Required Files: todo: add download locations) |
||
| Line 12: | Line 12: | ||
::There are four required packages that you need to have: | ::There are four required packages that you need to have: | ||
| − | ::#Openkore binaries for Microsoft Windows | + | ::#Openkore binaries for Microsoft Windows (start.exe|wxstart.exe, XSTools.dll, NetRedirect.dll) |
::#Field pack | ::#Field pack | ||
::#Default configuration files | ::#Default configuration files | ||
Revision as of 14:42, 7 November 2009
Contents
Introduction
If you are a new user, this is an easy guide to help you setup Openkore and make you start botting in no time.
Note. Actually, Openkore is not really that hard to setup. It is in fact one of the easiest bot programs to use.
This guide discusses in detail each step in setting up Openkore first-time. You start by downloading the required files, installing the packages, doing some basic configuration, checking your server details, and then starting the program.
Required Files
- Step 1: Downloading the latest Openkore
- The very first thing you need to do is download Openkore. You can get a copy from the download page of the Openkore website.
- There are four required packages that you need to have:
- Openkore binaries for Microsoft Windows (start.exe|wxstart.exe, XSTools.dll, NetRedirect.dll)
- Field pack
- Default configuration files
- Default table files
- There are four required packages that you need to have:
Note. If you are using Linux, download the Openkore source code instead of the binaries (it is under the Other Downloads section in the same page).
Installation
- Step 2: Extracting the Openkore packages
- Extract the contents of the main program package in your hard drive. You can choose any location you like (for example, "C:\").
- Notes
-
- Make sure that you extract the files using the folder structure saved in the zip file.
- If you are using WinRAR, select the radio button "Extract relative paths" in the Advanced Tab of the Extraction path and options dialog box.
- If you are using Winzip, check the checkbox "Use folder names" in the Extract dialog box.
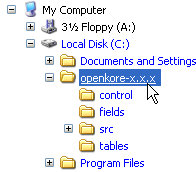
After extracting the main program, you will have a folder named openkore-x.x.x (where the "x.x.x" is the Openkore version). If you chose to extract it on "C:\" for example, the absolute path would be "C:\openkore-x.x.x". This will be your main bot folder.
Note. You can rename your main bot folder if you want to.
Extract the rest of the zip files (config pack, field pack and table pack) in your main bot folder. After extracting all the packages, you should have four subfolders in your main bot folder.
- Your openkore directory structure should be something like this.

Basic Configuration
- Step 3: Configuring some basic options
- This step is optional. You can skip it and follow the next step to start logging in to your RO server.
- Kore will run fine for most jobs without changing anything in the default configurations. By default, Kore will make your character walk randomly around the map, attack all monsters that it sees using it's weapon in close range, pick up items dropped by monsters it killed, and sit when its HP goes below 40%.
- If you have the Teleport Skill or you have some spare Fly Wings in your inventory, Kore will automatically teleport when it is near death. It will also cancel all incoming deals, as well as party and guild join requests.
- While the default behavior is good for most jobs, there are some other basic options that you might want to check first.
Note. I would like to keep this guide as simple as possible. The easiest characters to start botting with are those that uses weapons because the default configuration is set up for such characters. If you want to bot a character that relies primarily on attack skills (e.g. Mage), the configuration would be a bit complicated, but not necessarily hard. I recommend that you read the rest of the manual first, especially config.txt, to help you configure your bot. I, therefore, don't recommend using a Mage as your first time bot character unless you know what you are doing.
Quick tutorial on configuration editing:
The control folder inside your bot folder contains a set of text files that you edit (using a text editor) to set configurations that defines Kore's behavior.

The file config.txt among others is the main configuration file. It is where you configure most of Kore's behavior. It is basically composed of lines of texts each containing a configuration key name (the first word in each line) and the corresponding value.

attackAuto 2

In the example above, attackAuto is the configuration key name, and 2 is the value. When editing config.txt, you only set or modify the values. You must not change the configuration key names. Save the text file after editing.
Open your main bot folder, browse to the control subfolder, and open the file config.txt. There is quite a number of config keys that you will find inside this file, but just ignore all of them for now exept for the ones I will mention below.
- 1. Do you want to stay in a certain map?
- Kore can make your character stay in a certain map you specified. Look for the configuration key lockMap and set the value to the name of the map you want to stay into. For example, prt_fild08.
- If you are not inside your lockMap, Kore will try to walk back to it. If you die (hopefully, you won't), Kore will walk back to your lockMap after you sit to regenerate your HP.
- 2. Are you using a ranged weapon?
- If you are using a ranged weapon (e.g. Bow), it is important to set the configuration key attackDistance to your attack range (specified in number of blocks). A value of 10 may be good, but you can still increase it depending on some other factors (like the Vulture's Eye Skill).
- If you're not sure what your attack range is, simply set attackDistanceAuto to 1. This will auto-detect the correct value for attackDistance depending on your weapon.
- That's about the most basic concerns you should consider for now. If you want to play with some of the other options, I recommend that you read the config.txt section of this manual first. There are also some configuration guides that you might want to look at in the Openkore forum.
Server Details
- Step 4: Configuring server details
- You would most likely not do anything in this step, if you play on official servers.
- The latest versions of Openkore already have an updated server information for official RO servers that allows you to easily connect without having to configure anything firsthand. It's as easy as simply running the freshly downloaded (and extracted) program.
- If you want to check if Openkore already supports your server, open your main bot folder, browse to the tables subfolder, and open servers.txt. Look for the name of your server in the entries found in this file. The server names are enclosed in square brackets "[ ]".
- If you can't find your server in the list (or if you are having problems connecting to the master server), you have to figure out your server details first before continuing with the next step. Follow the steps provided in the Guide to figuring out Ragnarok Online server details. You can also find some good tips here.
If you successfully found your server details or if you are having problems, feel free to post them in the Official and Private Servers Info topic in the Openkore forum. Share your server details so they will be supported in future Openkore versions.
Program Startup
- Step 5: Starting Openkore
- Run the application file "start.exe" inside your main bot folder.
Note. If you are using Linux, run Openkore from the source code. See the instructions on How to run Openkore in Linux.
- The good thing about Openkore is that it detects if you haven't yet configured your login options in config.txt (i.e. username, password, master, server, and char). If you leave your login options empty, Openkore will guide you in properly setting these options at run-time.
- Step 5.1. Loading configuration files
- At startup, Openkore will load all necessary configuration and table files:
      Loading control/macros.txt...
      Loading control/config.txt...
      Loading control/items_control.txt...
      Loading control/mon_control.txt...
      Loading control/overallAuth.txt...
      Loading control/pickupitems.txt...
      Loading control/responses.txt...
      Loading control/timeouts.txt...
      Loading control/shop.txt...
      Loading control/chat_resp.txt...
      Loading control/avoid.txt...
      Loading control/priority.txt...
      Loading control/consolecolors.txt...
      Loading control/routeweights.txt...
      Loading control/arrowcraft.txt...
      Loading tables/cities.txt...
      Loading tables/commanddescriptions.txt...
      Loading tables/directions.txt...
      Loading tables/elements.txt...
      Loading tables/emotions.txt...
      Loading tables/equiptypes.txt...
      Loading tables/haircolors.txt...
      Loading tables/headgears.txt...
      Loading tables/items.txt...
      Loading tables/itemsdescriptions.txt...
      Loading tables/itemslots.txt...
      Loading tables/itemslotcounttable.txt...
      Loading tables/itemtypes.txt...
      Loading tables/maps.txt...
      Loading tables/monsters.txt...
      Loading tables/npcs.txt...
      Loading tables/packetdescriptions.txt...
      Loading tables/portals.txt...
      Loading tables/portalsLOS.txt...
      Loading tables/recvpackets.txt...
      Loading tables/servers.txt...
      Loading tables/sex.txt...
      Loading tables/skills.txt...
      Loading tables/skills.txt...
      Loading tables/skills.txt...
      Loading tables/skills.txt...
      Loading tables/skills.txt...
      Loading tables/spells.txt...
      Loading tables/skillsdescriptions.txt...
      Loading tables/skillssp.txt...
      Loading tables/skillsstatus.txt...
      Loading tables/skillsailments.txt...
      Loading tables/skillsstate.txt...
      Loading tables/skillslooks.txt...
      Loading tables/skillsarea.txt...
      Loading tables/skillsencore.txt...
      Checking for new portals... none found
      _
- Step 5.2. Setting your username
Note. If you have previously set your username, this step will not appear.
- Openkore will prompt you for your username:
      Enter Username:
      _
- Type your username in the console.
Note. Kore will automatically set this option (username) in config.txt so you won't have to specify it again everytime you run Openkore.
- Step 5.3. Setting your password
Note. If you have previously set your password, this step will not appear.
- Openkore will prompt you for your password:
      Enter Password:
      _
- Type your password in the console.
Note. Kore will automatically set this option (password) in config.txt so you won't have to specify it again everytime you run Openkore.
- Step 5.4. Choosing a master server
Note. If you have previously set your master server, this step will not appear.
- Openkore will show you a numbered list of known RO servers.
      ------- Master Servers --------
      #         Name
      0    AvalonRO Private Server
      1    Brazil - bRO
      2    EuphRO Private Server
      3    Europe - euRO
      4    ExcaliburRO Private Server
      5    Hakore Server
      6    India - inRO
      7    Indonesia - idRO: Chaos/Loki/Iris/Fenrir
      8    Indonesia - idRO: Sakray
      9    International - iRO: Chaos/Loki/Iris
      10   International - iRO: Sakray
      11   Malaysia - mRO (English): Iris/Penril/Odin/
      12   Malaysia - mRO: Main Server
      13   Malaysia - mRO: Sakray
      14   NamelessRO: Eclipse Private Server
      15   NamelessRO: Sunrise Private Server
      16   Oceania/Australia - oRO
      17   Oceania/Australia - oRO: Sakray
      18   Philippines - pRO: Fenrir/Iris/Lydia
      19   Philippines - pRO: Loki/Sarah
      20   Philippines - pRO: Odin/Chaos
      21   Philippines - pRO: Sakray
      22   Philippines - pRO: Urdr
      23   ProjectRO Private Server
      24   SonicRO Private Server
      25   Thailand - tRO Account 1: Fenrir,Lydia,Sara
      26   Thailand - tRO Account 1: Sol, Chaos, Loki,
      27   Thailand - tRO Account 2: Frigg,Freya,Baldu
      28   Thailand - tRO Account 2: Honir,Odin,Thor
      29   Thailand - tRO Account 3: Bijou, Grimnir, B
      30   Thailand - tRO Account 3: Isa, Tyr, Idun
      31   VanRO: Medium Rate Private Server
      32   XaosRO Private Server
      33   aeRO Private Server
      34   agRO Private Server
      35   mobRO Private Server
      36   powRO Private Server
      37   qRO Private Server
      -------------------------------
      Enter the number of your master server:
      _
- Choose the master server where you want to bot in and type the corresponding number in the console.
Note. Kore will automatically set this option (master) in config.txt so you won't have to specify it again everytime you run Openkore.
- If you can't find your server in the displayed list, read the fourth step in this guide again. Exit the program for now by closing the console window. Restart this step after you have properly configured your server details.
- Step 5.5. Connecting to Master Server
- If you have your username, password and master server properly set in config.txt, Kore will now login to the Master Server using your login details. Your account information will be retrieved and a list of available game login servers from the master server will be displayed:
      Connecting to Master Server...
      Connecting (127.0.0.1:6900)... connected
      ---------Account Info-------------
      Account ID: 2000003    83 84 1E 00
      Sex:        Boy
      Session ID: 2135588863 FF 7F 4A 7F
                  269906564  84 72 16 10
      ----------------------------------
      --------- Servers ----------
      #         Name            Users  IP              Port
      0   Bot-Owns              0      127.0.0.1       6121
      -------------------------------
      Closing connection to Master Server
      Disconnecting (127.0.0.1:6900)... disconnected
      _
- If you can't connect, this error will appear:
      Connecting to Master Server...
      Connecting (127.0.0.1:6900)... couldn't connect: Unknown error
      _
- The reason for this may be one of the following
-
- You are not connected to the internet.
- Your server is currently down, or under server maintenance.
- The server details is outdated. Read the fourth step in this guide again or consult the Openkore forum for latest news and updates.
- Step 5.6. Choosing your server
Note. If you have previously set your server, this step will not appear.
- Openkore will prompt you for a server:
      --------- Servers ----------
      #         Name            Users  IP              Port
      0   Bot-Owns              0      127.0.0.1       6121
      -------------------------------
      Closing connection to Master Server
      Disconnecting (127.0.0.1:6900)... disconnected
      Choose your server.  Enter the server number:
      _
- Choose the server where you want to bot in and type the corresponding number in the console.
Note. Kore will automatically set this option (server) in config.txt so you won't have to specify it again everytime you run Openkore.
- Step 5.7. Connecting to Game Login Server
- If you have your server specified in config.txt, Kore will now login to the server. All your available characters will be listed:
      Connecting to Game Login Server...
      Connecting (127.0.0.1:6121)... connected
      Received characters from Game Login Server
      ---------------------- Character List ----------------------
        # Name                               Job             Lv
        0 GMHakore                           Priest          99/50
      ------------------------------------------------------------
      _
- Step 5.8. Choosing your character
Note. If you have previously set the option char in config.txt, this step will not appear.
- Openkore will prompt you to choose a character. You also have the option to create a new character or delete an existing character:
      ---------------------- Character List ----------------------
        # Name                               Job             Lv
        0 GMHakore                           Priest          99/50
      ------------------------------------------------------------
      Type 'c' to create a new character, or type 'd' to delete a character.
      Or choose a character by entering its number.
      _
- If you already have a character created in your account, simply choose the character you want to bot and type the corresponding number in the console.
Note. Kore will automatically set this option (char) in config.txt so you won't have to specify it again everytime you run Openkore.
- If you haven't created a character, Kore can help you on how to create a new character. However, the steps are beyond the scope of this guide, so it will not be explained in detail here. Just follow the instructions given by Kore and you'll do fine.
- Step 5.9. Botting starts
- With all your login details set up, Kore will now login to the map server and start the game:
      Received character ID and Map IP from Game Login Server
      ----------Game Info----------
      Char ID: F5 49 02 00 (150005)
      MAP Name: gef_fild04.gat
      MAP IP: 127.0.0.1
      MAP Port: 5121
      -----------------------------
      Closing connection to Game Login Server
      Disconnecting (127.0.0.1:6121)... disconnected
      Connecting to Map Server...
      Connecting (127.0.0.1:5121)... connected
      You are now in the game
      Your Coordinates: 312, 273
      Remove perfectly hidden Player Unknown #150001 (0)
      Remove perfectly hidden Monster Poring (0)
      Calculating random route to: Geffen Field(gef_fild04): 257, 353
      _
- Congratulations! You have successfully set up Openkore! Your character will now walk around Midgard, kill monsters, and take loots!
- You shouldn't have any problems setting up Kore if you follow this guide. If you do however experience problems after trying all possible solutions your intelligent mind can think of, post an intelligent question in the Openkore Forum.
Final Notes
- Step 6: Reading the rest of the manual
- Configuring Kore does not end here. You must now read the rest of the manual and start some advanced configuration of your bot, especially if you want to use skills. There are also tons other nice features and options that you would want to exploit.