Connectivity Guide: Difference between revisions
TODO: Write about serverTypes (i really have no idea what are them), maybe add information about the other servers.txt entrys (gameguard, storageEncryptKey, secureLogin, paddedPackets, recvpackets) |
No edit summary |
||
| (62 intermediate revisions by 9 users not shown) | |||
| Line 1: | Line 1: | ||
OpenKore comes with a | ==Getting Server Information== | ||
OpenKore comes with a list of official servers information only, because of the high amount of private servers, it is impossible to have and keep them updated, so private servers players should follow this guide to get and update their server information. | |||
Before continuing, read the list of [[unsupported servers]]. Your server might have anti-bot protection resulting in not being supported by Openkore. | |||
OpenKore requires the following information about the Ragnarok Online server before it can initialize and login: | |||
* The server name | |||
* The server's host ([[wikipedia:IP address|IP address]] or [[wikipedia:hostname|hostname]]) and [[wikipedia:computer port (software)|port]] | |||
* The server's [[Connectivity_Guide#Required|master version]] number, [[Connectivity_Guide#Required|version]] number, [[Connectivity_Guide#Required|character encoding]], [[Connectivity_Guide#Required|charBlockSize]] | |||
* [[Connectivity_Guide#Syntax|addTableFolders]] to look for tables in | |||
OpenKore | There are detailed instructions on collecting server information with [http://wpepro.net/ WPE] or [http://wireshark.org/ Wireshark]. This kind of packet analyze isn't anything special for OpenKore or Ragnarok Online, so it's up to you to get [[wikipedia:packet analyzer|the tools]] and ways to do it which work for you. It's up to you as well what to do with any so-called "protection" in your server's client that may get in the way. | ||
There may be problems determining [[Connectivity_Guide#Required|version]] and [[Connectivity_Guide#Required|master_version]] if your server's protocol has some kind of encryption. In that case, merely determining these values won't even help, the main issue is dealing with that encryption. | |||
===WPE (Winsock Packet Editor)=== | |||
'''1.''' [https://mega.nz/file/TJQQUJrA#pHX_-h7A2Fnibh0H0ZLwMYQvAGK6ABOf8puOOtQ3orM Download] WPE and extract it (password: openkore). | |||
:* Before downloading, make a sure to disable your anti-virus as it can mark WPE as a virus and delete it. '''Download at your risk''', we will not be resposabilized if your computer crashes. | |||
:* You will need some programs to extract it, the common ones are [http://www.rarlab.com/ WinRAR] and [http://www.7-zip.org/ 7zip]. | |||
'''2.''' Open your ragnarok but '''''don't login yet!''''' Leave it on the login screen and open WPE. | |||
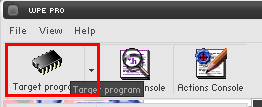
'''3.''' At WPE's window, click on '''''Target Programs''''' button. | |||
:[[File:Targetyc.png]] | |||
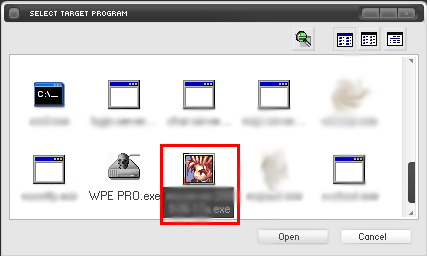
'''4.''' A window will open, search for the server's executable and double-click it. | |||
:[[File:Clickrag.png]] | |||
:''' | :'''Note.''' Some servers "hide" their executables by renaming it (like from xxxRO.exe to xxxx.dll or xxxxx.bin), so don't worry if the executable isn't a .exe one. | ||
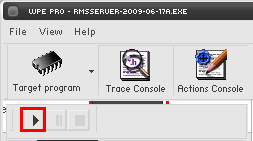
'''5.''' In the WPE's window, click on '''Play button'''. | |||
:[[File:Play.png]] | |||
'''6.''' Switch to your Ragnarok's window, put and try to login. | |||
:'''Note.''' Valid login information are not needed. | |||
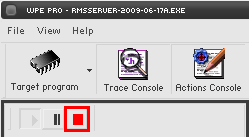
'''7.''' Back to WPE's window, click on '''Stop button''' | |||
:[[File:Stopjw.png]] | |||
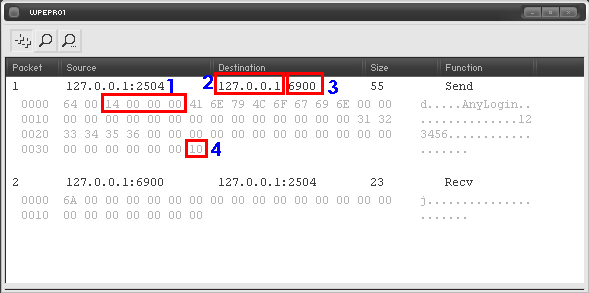
'''8.''' A window will open with recorded data. One of the packets sent to the server would be '''login packet''' which usually contains the server's '''version''', '''master_version''', '''IP''' and '''port''' - write them down because they are going to be used later. The packets will be different on each server, possible login packets may start with '''64 00''' or '''02 B0'''. Other packets (such as 18-byte-long '''02 04''') may be sent before login packet. | |||
:[[File:Inforb.png]] | |||
:'''Legend''': | |||
#version (displayed as 4-byte unsigned number in [[wikipedia:endianness|little-endian]], in [[wikipedia:hexadecimal|hex]]) | |||
#IP (as is) | |||
#port (as is) | |||
#master version (displayed as 1-byte unsigned number, in hex) | |||
'''9.''' See [[Connectivity Guide#Converting Hexadecimal to Decimal numbers|Converting Hexadecimal to Decimal numbers]] to convert the master_version and version before configuring Kore. | |||
===Wireshark=== | |||
'''1.''' [http://www.wireshark.org/download.html Download] and install Wireshark. | |||
'''2.''' Open your ragnarok but '''''don't login yet!''''' Leave it on the login screen and open Wireshark. | |||
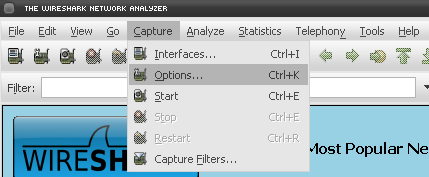
'''3.''' At Wireshark's window, go to '''Capture > Options''' on the upper menu or press '''Ctrl + K'''. | |||
:[[File:Capiture.png]] | |||
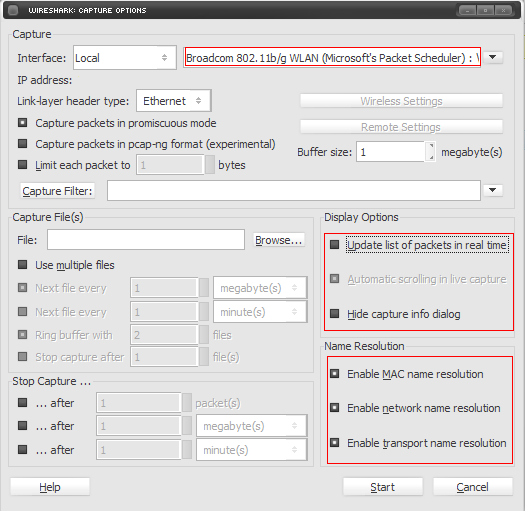
'''4.''' In the top right box, select the interface that will be used to capture on. If there isn't any specific interface to use, select the one whose IP address is equal to the your ip address or is not '''''unknown'''''. Alternatively you can try all of them and use the one that records the packets. Set the others settings like the images bellow: | |||
:[[File:Interface.PNG]] | |||
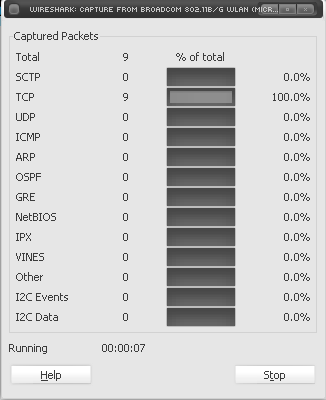
'''5.''' Click on '''Start button''' and go back to the Ragnarok window and login. | |||
:'''Note.''' Valid information are not needed. | |||
'''6.''' Back to Wireshark and click on '''Stop button'''. | |||
:[[File:Stop.png]] | |||
'''7.''' In Wireshark main window, you can see the TCP segments that were captured. Fill in the packet filter, but what to fill in depends on the username you used to login. | |||
:Enter this in the "Filter" text box: | |||
: | eth contains "xxxxxx" or eth contains xxxxxx | ||
: | |||
:Replace '''''xxxxxx''''' with the username that was used to login and press enter. In the example bellow, username was Mushroom. | |||
:[[File:Filter.png]] | |||
'''8.''' There will be only one entry now, click on it to show some information about it. This is where the '''IP and port''' is stored. | |||
:[[File:Ip.png]] | |||
: Write down the IP and port. | |||
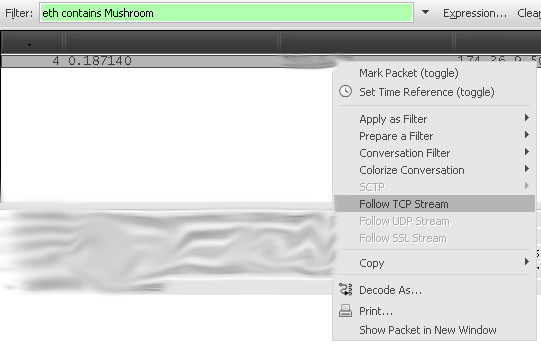
'''9.''' On the entry again, right-click on it and go to '''Follow TCP Stream'''. | |||
:[[File:Tcp.png]] | |||
'''10.''' A new window will open, in the bottom left, select '''Hex Dump'''. | |||
:[[File:Hex.png]] | |||
'''11.''' These are the login packets. Take a look at it and write down the packets that contains the '''version and master version''' numbers. They are marked on the image bellow. | |||
:[[File:Packets.png]] | |||
* version displayed as 4-byte unsigned number in [[wikipedia:endianness|little-endian]], in [[wikipedia:hexadecimal|hex]] | |||
* master version displayed as 1-byte unsigned number, in hex | |||
'''12.''' See [[Connectivity Guide#Converting Hexadecimal to Decimal numbers|Converting Hexadecimal to Decimal numbers]] to convert the master_version and version before configuring Kore. | |||
== Converting Hexadecimal to Decimal numbers == | |||
Master_version and server version collected from the login packets are in hexadecimal number (base-16) and Kore expects a decimal number (base-10), so converting those numbers are needed before Kore can read them. | |||
Converting can be made using Windows' calculator or any other site that has a hex to dec calculator. | |||
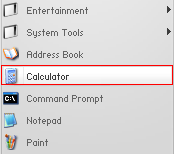
'''1.''' Open Windows calculator '''Start > Accessories > Calculator'''. | |||
:: | :[[File:Calc.PNG]] | ||
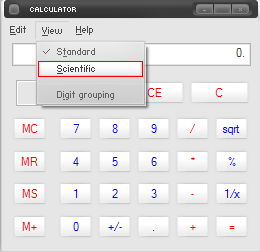
'''2.''' Go to '''View''' on the upper menu and click on '''Scientific'''. | |||
:[[File:Sci.PNG]] | |||
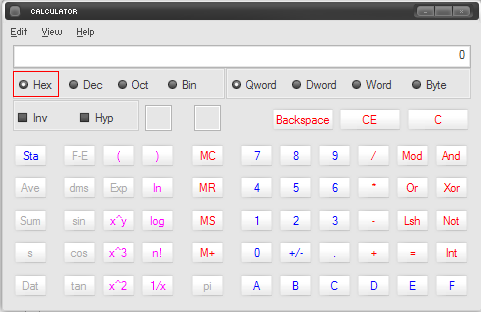
'''3.''' Check the circle beside '''Hex'''. | |||
:[[File:Hexa.PNG]] | |||
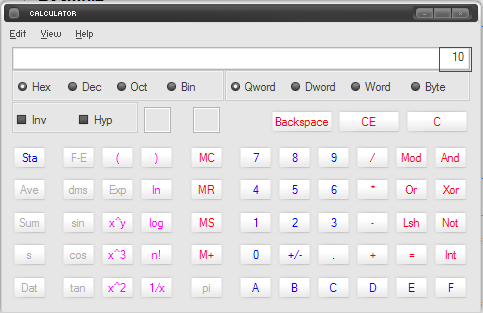
'''4.''' On the calculator, type the number that you got for master_version and version. In the example, master_version hexadecimal number is '''10'''. | |||
:: | :[[File:Type.PNG]] | ||
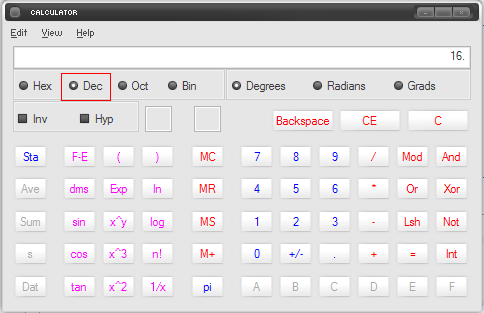
'''5.''' Check the circle beside '''Dec'''. | |||
:[[File:Dec.PNG]] | |||
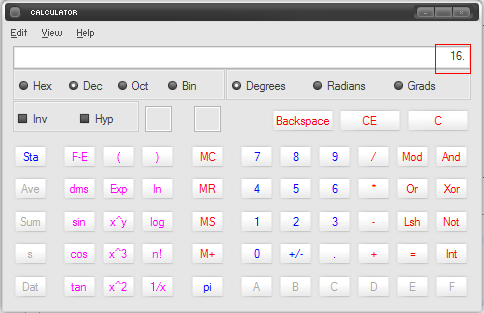
'''6.''' After checking, the number shown should automatically be converted from hexadecimal to decimal. | |||
:[[File:Done.PNG]] | |||
:''' | : You must convert '''master_version''' and '''version'''. | ||
== Configuring Openkore == | |||
OpenKore reads server information from a file named '''servers.txt'''. The file is on ''tables'' folder. | |||
If your server is not listed in the file, then add a new entry. If your server is already listed, then modify the existing entry. | |||
=== Syntax === | |||
[<server name>] | |||
ip <number/host> | |||
port <number> | |||
version <number> | |||
master_version <number> | |||
serverType <serverType name> | |||
serverEncoding <[[encoding]]> | |||
charBlockSize <number> | |||
addTableFolders <folder path> | |||
# following options are optional | |||
private <boolean> | |||
recvpackets <file name> | |||
chatLangCode <boolean> | |||
storageEncryptKey <encrypt key> | |||
field_<location> <filename> | |||
clientHash <hex string> | |||
captcha <boolean> | |||
gameGuard <number> | |||
secureLogin <boolean> | |||
secureLogin_type <type> | |||
secureLogin_requestCode <hex string> | |||
secureLogin_account <boolean> | |||
preLoginCode <boolean> | |||
paddedPackets <boolean> | |||
paddedPackets_attackID <packet switches> | |||
paddedPackets_skillUseID <packet switches> | |||
masterLogin_packet <packet switch> | |||
OTP_ip <IP_or_hosthame> | |||
OTP_port <number> | |||
dead <boolean> | |||
dead_message <any text> | |||
title <any text> | |||
pinCode <boolean> | |||
charDeleteDateType <boolean> | |||
blockingPlayerCancel <boolean> | |||
rankingSystemType <boolean> | |||
itemListType <boolean> | |||
ignoreAntiCheatWarning <boolean> | |||
==== Required ==== | |||
:''' | ; [<server name>] | ||
:: | : The name of the server that you want to bot. The name '''must be''' between '''[ ]'''. | ||
: Developers: avoid changing existing server names, it disrupts configurations. Instead use ''title'' option if you need to change displayed title for a server. | |||
; ip <number/host> | |||
: Server's login IP. | |||
:' | ; port <number> | ||
: Server's login port number. | |||
; version <number> | |||
: Server's version (converted from hex to decimal). | |||
:' | ; master_version <number> | ||
: Server's master_version (converted from hex to decimal). | |||
; [[serverType]] | |||
{{Available since 2.1}} | |||
: Server's type. Each official server has its own serverType, private servers must use '''kRO serverTypes''' according to executables dates. | |||
; serverEncoding <[[encoding]]> | |||
: Character encoding. | |||
{{:charBlockSize}} | |||
{{:addTableFolders}} | |||
==== Optional ==== | |||
{{:private}} | |||
{{:recvpackets}} | |||
{{:chatLangCode}} | |||
{{:storageEncryptKey}} | |||
{{:field}} | |||
{{:clientHash}} | |||
{{:captcha}} | |||
{{:gameGuard}} | |||
{{:secureLogin}} | |||
<!-- | |||
included: | |||
secureLogin_type <number> | |||
secureLogin_requestCode <hex string> | |||
secureLogin_account <bollean> | |||
--> | |||
{{:preLoginCode}} | |||
{{:masterLogin_packet}} | |||
{{:OTP_ip}} | |||
{{:OTP_port}} | |||
{{:dead_message}} | |||
{{:title}} | |||
{{:pinCode}} | |||
{{:charDeleteDateType}} | |||
{{:blockingPlayerCancel}} | |||
{{:rankingSystemType}} | |||
{{:itemListType}} | |||
{{:itemListUseOldType}} | |||
{{:ignoreAntiCheatWarning}} | |||
<!-- | |||
; paddedPackets <[[boolean]]> | |||
: ?? | |||
; paddedPackets_attackID <packet switches> | |||
: ?? | |||
; paddedPackets_skillUseID <packet switches> | |||
: ?? | |||
--> | |||
=== Example === | |||
[MushroomRO] | [MushroomRO] | ||
ip 127.0.0.1 | ip 127.0.0.1 | ||
| Line 132: | Line 245: | ||
master_version 16 | master_version 16 | ||
version 20 | version 20 | ||
serverType | serverType kRO_RagexeRE_2010_01_26a | ||
charBlockSize 108 | charBlockSize 108 | ||
serverEncoding Western | serverEncoding Western | ||
recvpackets mush-recvpackets.txt | |||
addTableFolders iRO | |||
[[Category:servers.txt]] | |||
Latest revision as of 23:07, 21 May 2025
Getting Server Information
OpenKore comes with a list of official servers information only, because of the high amount of private servers, it is impossible to have and keep them updated, so private servers players should follow this guide to get and update their server information. Before continuing, read the list of unsupported servers. Your server might have anti-bot protection resulting in not being supported by Openkore.
OpenKore requires the following information about the Ragnarok Online server before it can initialize and login:
- The server name
- The server's host (IP address or hostname) and port
- The server's master version number, version number, character encoding, charBlockSize
- addTableFolders to look for tables in
There are detailed instructions on collecting server information with WPE or Wireshark. This kind of packet analyze isn't anything special for OpenKore or Ragnarok Online, so it's up to you to get the tools and ways to do it which work for you. It's up to you as well what to do with any so-called "protection" in your server's client that may get in the way.
There may be problems determining version and master_version if your server's protocol has some kind of encryption. In that case, merely determining these values won't even help, the main issue is dealing with that encryption.
WPE (Winsock Packet Editor)
1. Download WPE and extract it (password: openkore).
2. Open your ragnarok but don't login yet! Leave it on the login screen and open WPE.
3. At WPE's window, click on Target Programs button.
4. A window will open, search for the server's executable and double-click it.
- Note. Some servers "hide" their executables by renaming it (like from xxxRO.exe to xxxx.dll or xxxxx.bin), so don't worry if the executable isn't a .exe one.
5. In the WPE's window, click on Play button.
6. Switch to your Ragnarok's window, put and try to login.
- Note. Valid login information are not needed.
7. Back to WPE's window, click on Stop button
8. A window will open with recorded data. One of the packets sent to the server would be login packet which usually contains the server's version, master_version, IP and port - write them down because they are going to be used later. The packets will be different on each server, possible login packets may start with 64 00 or 02 B0. Other packets (such as 18-byte-long 02 04) may be sent before login packet.
- Legend:
- version (displayed as 4-byte unsigned number in little-endian, in hex)
- IP (as is)
- port (as is)
- master version (displayed as 1-byte unsigned number, in hex)
9. See Converting Hexadecimal to Decimal numbers to convert the master_version and version before configuring Kore.
Wireshark
1. Download and install Wireshark.
2. Open your ragnarok but don't login yet! Leave it on the login screen and open Wireshark.
3. At Wireshark's window, go to Capture > Options on the upper menu or press Ctrl + K.
4. In the top right box, select the interface that will be used to capture on. If there isn't any specific interface to use, select the one whose IP address is equal to the your ip address or is not unknown. Alternatively you can try all of them and use the one that records the packets. Set the others settings like the images bellow:
5. Click on Start button and go back to the Ragnarok window and login.
- Note. Valid information are not needed.
6. Back to Wireshark and click on Stop button.
7. In Wireshark main window, you can see the TCP segments that were captured. Fill in the packet filter, but what to fill in depends on the username you used to login.
- Enter this in the "Filter" text box:
eth contains "xxxxxx" or eth contains xxxxxx
- Replace xxxxxx with the username that was used to login and press enter. In the example bellow, username was Mushroom.

8. There will be only one entry now, click on it to show some information about it. This is where the IP and port is stored.
- Write down the IP and port.
9. On the entry again, right-click on it and go to Follow TCP Stream.
10. A new window will open, in the bottom left, select Hex Dump.
11. These are the login packets. Take a look at it and write down the packets that contains the version and master version numbers. They are marked on the image bellow.
- version displayed as 4-byte unsigned number in little-endian, in hex
- master version displayed as 1-byte unsigned number, in hex
12. See Converting Hexadecimal to Decimal numbers to convert the master_version and version before configuring Kore.
Converting Hexadecimal to Decimal numbers
Master_version and server version collected from the login packets are in hexadecimal number (base-16) and Kore expects a decimal number (base-10), so converting those numbers are needed before Kore can read them.
Converting can be made using Windows' calculator or any other site that has a hex to dec calculator.
1. Open Windows calculator Start > Accessories > Calculator.
2. Go to View on the upper menu and click on Scientific.
3. Check the circle beside Hex.
4. On the calculator, type the number that you got for master_version and version. In the example, master_version hexadecimal number is 10.
5. Check the circle beside Dec.
6. After checking, the number shown should automatically be converted from hexadecimal to decimal.
- You must convert master_version and version.
Configuring Openkore
OpenKore reads server information from a file named servers.txt. The file is on tables folder.
If your server is not listed in the file, then add a new entry. If your server is already listed, then modify the existing entry.
Syntax
[<server name>]
ip <number/host>
port <number>
version <number>
master_version <number>
serverType <serverType name>
serverEncoding <encoding>
charBlockSize <number>
addTableFolders <folder path>

# following options are optional
private <boolean>
recvpackets <file name>
chatLangCode <boolean>
storageEncryptKey <encrypt key>
field_<location> <filename>
clientHash <hex string>
captcha <boolean>

gameGuard <number>

secureLogin <boolean>
secureLogin_type <type>
secureLogin_requestCode <hex string>
secureLogin_account <boolean>

preLoginCode <boolean>

paddedPackets <boolean>
paddedPackets_attackID <packet switches>
paddedPackets_skillUseID <packet switches>

masterLogin_packet <packet switch>

OTP_ip <IP_or_hosthame>
OTP_port <number>

dead <boolean>
dead_message <any text>
title <any text>

pinCode <boolean>
charDeleteDateType <boolean>
blockingPlayerCancel <boolean>
rankingSystemType <boolean>
itemListType <boolean>
ignoreAntiCheatWarning <boolean>
Required
- [<server name>]
- The name of the server that you want to bot. The name must be between [ ].
- Developers: avoid changing existing server names, it disrupts configurations. Instead use title option if you need to change displayed title for a server.
- ip <number/host>
- Server's login IP.
- port <number>
- Server's login port number.
- version <number>
- Server's version (converted from hex to decimal).
- master_version <number>
- Server's master_version (converted from hex to decimal).
| The following documentation describes a feature that was greatly changed in SVN trunk (latest development version) since the last release. It may work differently or not be available if you're using 2.0.7 or any older version. |
- Server's type. Each official server has its own serverType, private servers must use kRO serverTypes according to executables dates.
- serverEncoding <encoding>
- Character encoding.
- charBlockSize <value>
- Length (in bytes) of data block describing each of your characters in the packet with character list (
received_characters) on character selection screen.
Correct value for a server may be not supported by a specific serverType or not supported at all, so merely trying values mentioned here may not be enough.
| charBlockSize | kRO date | Kore version | Notes |
|---|---|---|---|
| ∞ | New charBlockSizes are being constantly introduced. | ||
| 175 | 2020-10-07 | 6b369db | HP and SP int64 |
| 155 (default) | 2017-08-30 | a6d3f87 | exp int64 |
| 147 | 2014-10-22 | df50355 | walk_speed long |
| 146 | N/A | 3aeba6a | |
| 145 | 2014-10-16 | 3001eab and 8fa8dfa | iRO's Doram update |
| 144 | 2011-10-25 | 876acab | "rename char" |
| 140 | 2011-09-28 | 876acab | "change slot feature" |
| 136 | 2011-01-11 | b5b8e07 | "robe" |
| 132 | 2010-08-03 | b5b8e07 | "delete date" |
| 128 | daefa83 | last_map 16 Bytes | |
| 124 | 3b07ffe | bRO (bifröst update) | |
| 116 | addabe5 | ||
| 112 | 9862177 | Topic on the forum | |
| 108 | 9862177 | Topic on the forum | |
| 106 | |||
Dates are for a reference with default Athena configuration only, any server can reconfigure that.
In Athena code base, function mmo_char_tobuf generates character blocks.
| Implementation of this feature is expected to become outdated with server updates. As OpenKore is a free project, if you stumble upon such updates, you are expected to fix the problem and contribute your changes back. Usually, server supporters will do that, but there isn't any for random private servers, and some official ones may not always be covered. |
- addTableFolders <folder path>
- Configures Kore to load tables file from the specified path (relative to the tables directory).
- Used only when there is no --tables specified.
- For english ones, you can use
addTableFolders translated/kRO_english
- or
addTableFolders iRO
Optional
- private <boolean>
- Set this option if Openkore connects to a wrong map-server IP. Usually for private servers.
- recvpackets <file name.txt>
- Configures file's name for recvpackets. See also: Packet Length Extractor.
- chatLangCode <boolean>
- Enables support for language codes (a pipe and two hexadecimal digits) in chat messages.
- storageEncryptKey [<encrypt key>]
- Specifies your server's storage encryption key.
- field_<location> <filename>
- This parameter allows you to set a synonym for the location name. This parameter is useful if your server uses outdated or modified locations.
- clientHash <boolean>
- Set this option if Openkore connects to a wrong map-server IP. Usually for private servers.
- captcha <boolean>
- Configure Kore to use the captcha 'protocol', this captcha is initiated at select characters screen.
- secureLogin <number>
- Specify a value if "secureLogin" is used on the server.
- secureLogin_type <number>
- Specify the type "secureLogin" if used on the server. This value determines which packet will be sent to the server.
- secureLogin_requestCode <hex string>
- OpenKore will use the code specified in this parameter to connect to the server. If any value is specified in this parameter, then the "secureLogin_type" parameter will be ignored.
- The <hex string> is a space-separated sequence of hex codes. For example:
04 02 22 37 D7 FC. - secureLogin_account <boolean>
- It looks like this is only used when "secureLogin = 3" in the package
'01FA' 'master_login'
- preLoginCode <boolean>
- If your server uses sending a special packet before sending 'master_login', then put "1" here. It looks like it's not being used anywhere right now.
- masterLogin_packet <packet_switch>
- Overrides master login packet switch (but not its structure). Required for XKore 2 if it's different from 0064.
- OTP_ip <IP_or_hosthame>
- Server's login IP (with OTP - One Time Password)
- OTP_port <number>
- Server's login port number (with OPT - One Time Password)
- dead <boolean>
- Set 1 if your server shuts down. Such a server cannot be selected from the list. If the server is already registered in the configuration, then a corresponding error message is displayed.
- dead_message <any_text>
- Server shutdown message. Default message: Server you've selected (%s) is now marked as dead.
- title <server_name>
- Server name that will be shown in the list when you select a server. You can take any value, in contrast to the "[<server_name>]", which is better not to touch.
- Example: instead of
International - iRO: Loki Classicit will showInternational - iRO: Loki (Classic-compatible):
[International - iRO: Loki Classic]
title International - iRO: Loki (Classic-compatible)
- charDeleteDateType <boolean>
- Set this if your server require current timedate to delete character.
- blockingPlayerCancel <boolean>
- Set this if your server require client send
blocking_player_cancelpacket (0447). Does not work only in the XKore 1 mode.
- rankingSystemType <boolean>
- Set this if your server uses
rank_generalinstead ofrank_killer,rank_taekwon,rank_alchemist,rank_blacksmith.
- itemListType <boolean>
- Set this if your server use
item_listpackets (0B08 ~ 0B0B) instead of regular list - see github PR#2887
- itemListUseOldType <boolean>
- Using the old items type in a item list
- see github PR#3700
- ignoreAntiCheatWarning <boolean>
- If this option is enabled, disables warning about Anti-Cheats.
- At the moment this only works with EAC (Easy Anti-Cheat) protection.
Example
[MushroomRO]
ip 127.0.0.1
port 6900
master_version 16
version 20
serverType kRO_RagexeRE_2010_01_26a
charBlockSize 108
serverEncoding Western
recvpackets mush-recvpackets.txt
addTableFolders iRO
